
Crochet Frogy Mommy Pattern
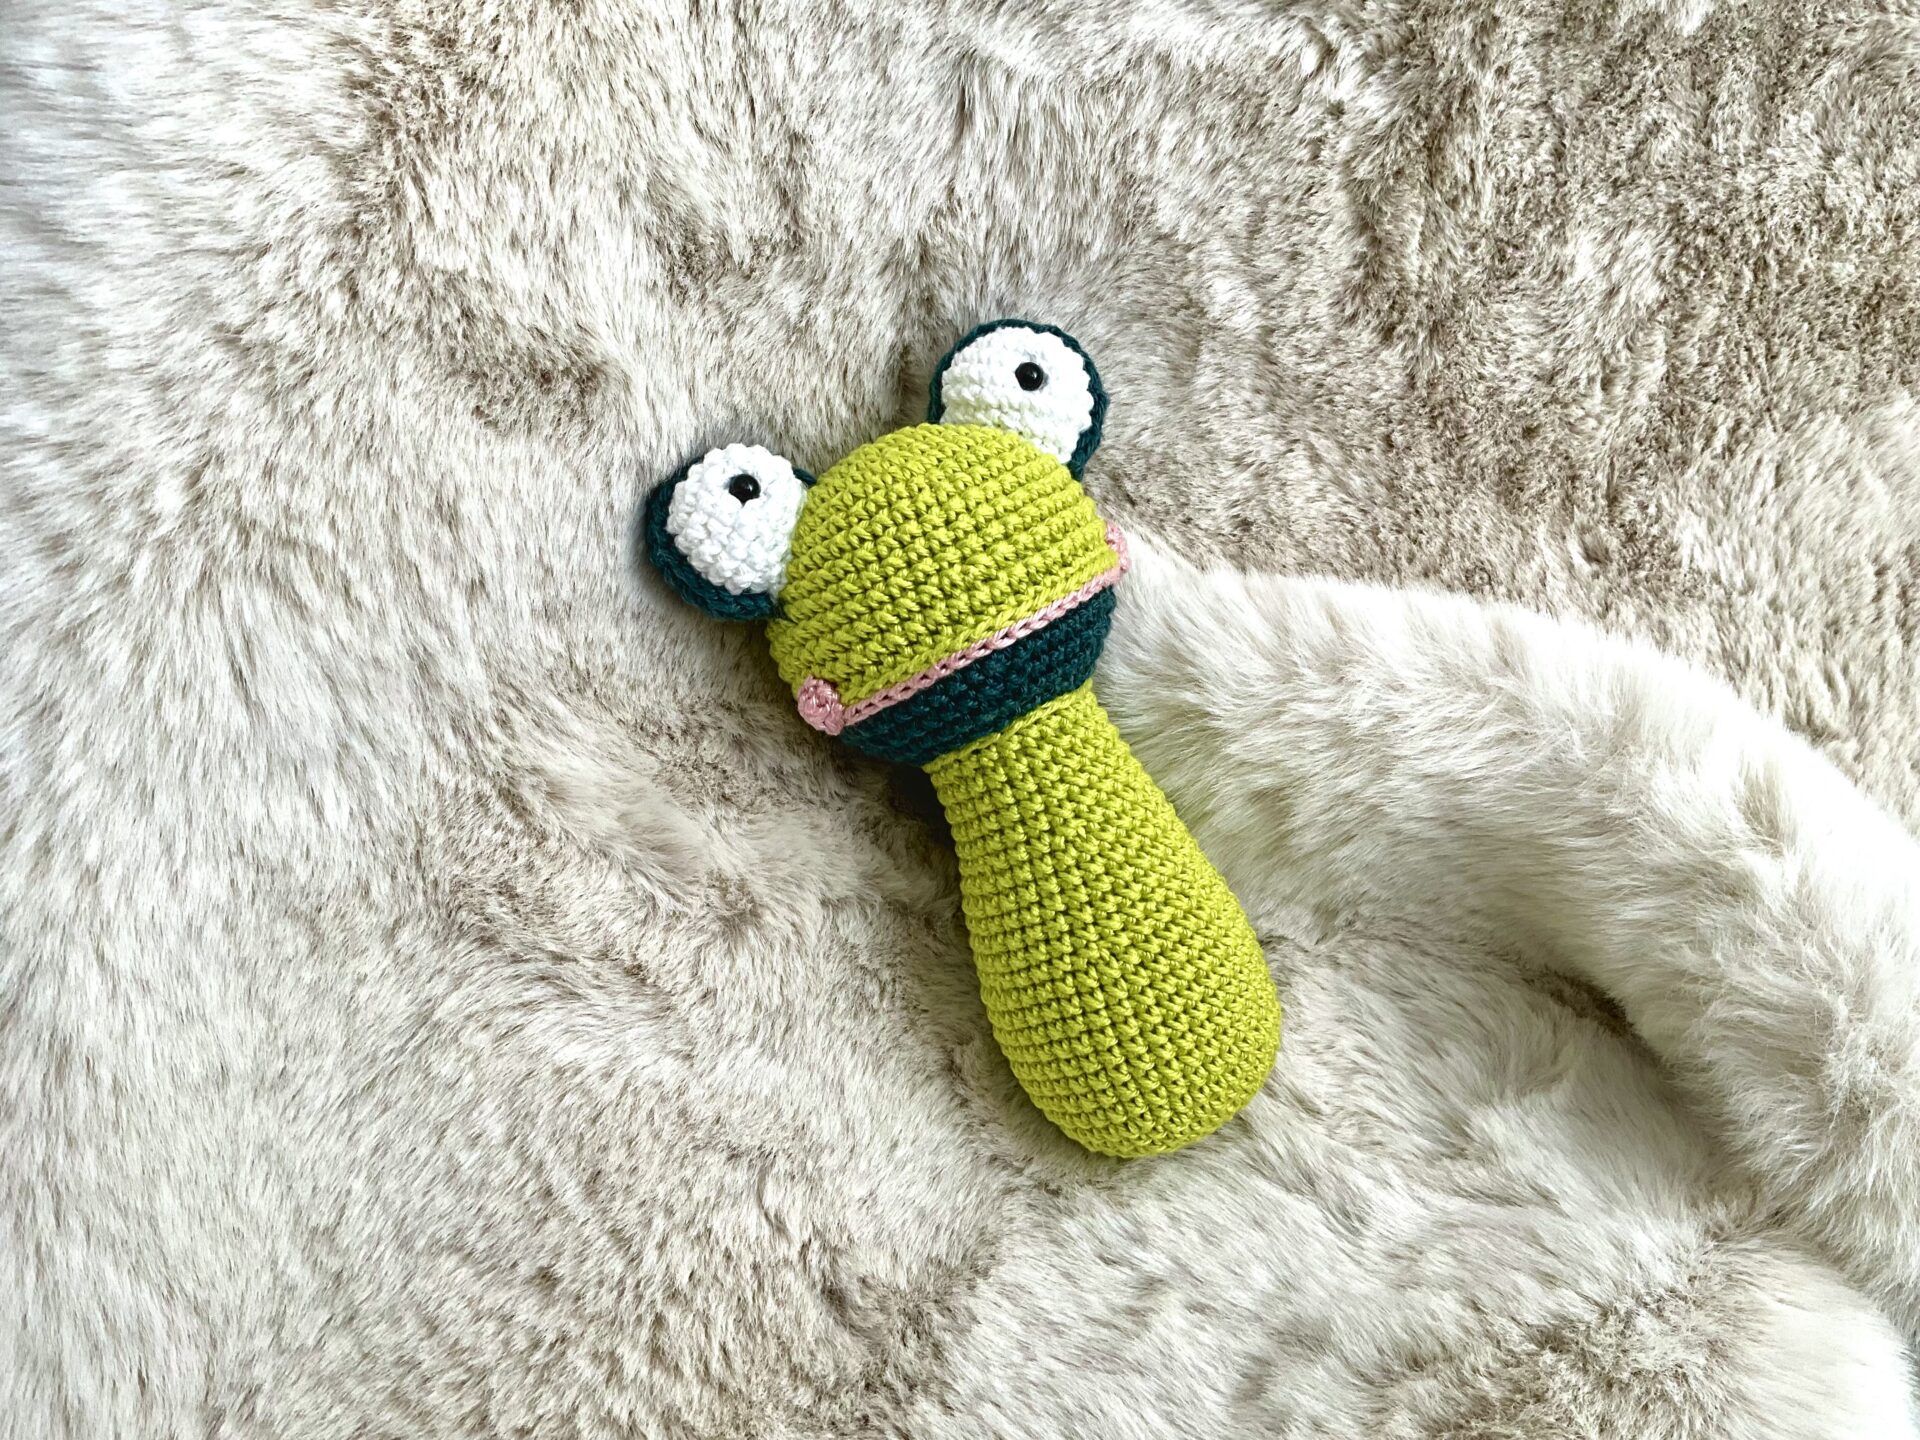
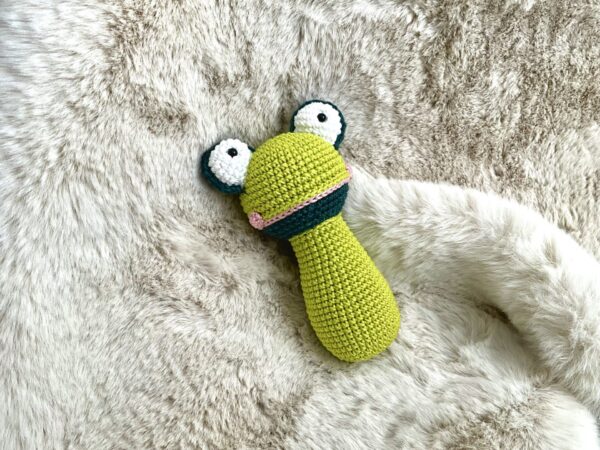
Let me introduce this pattern to you, it’s a beautiful charming mommy frog with a warm smile and lovely big eyes. This crochet frog pattern is well described,so intermediate crocheters can easily manage to make this rattle.
New to crochet? For more information about abbreviations, check out a full list on my post Crochet abbreviations and terms.
Crochet Froggy Mommy Pattern
Basic Feaures
The pattern uses the following:
- Yarn:
- Schachenmayr: Catania (Fingering weight yarn)
- 50 g – 125 m ; 1.75 oz – 137 yds
- 100% cotton
- Colors:
- C1: anis No: 00205 (1 skein) for head and body
- C2: agave No: 00244 (1 skein) for eyelids
- C3: altrosa No: 00408 (1 skein) for mouth
- C4: weiss(white) No: 00106 (1 skein) for eyes
- Hook: 2.5 mm ; US=C/2 ; UK=12
- Safety eyes: 5 mm (1 pair)
- Polyester filling (fibrefill )
- Rattle: 2 cm | 0.787 in diameter or smaller
- Others:
- embroidery needle or tapestry needle
- scissors
Finished Size:
- High: 15 cm | 5.9 in
- Width: 8,5 cm | 3.35 in
Notes
- This pattern is written in US terminology.
- For Amigurumi allways use a hook that is smaller than the size recommended for your yarn weight. This will ensure that your stuffing will not show through the stitches.
- All pieces are worked in the round. Use a stitch marker to indicate the beginning of each round.
- Invisible decreases are recommended.
- Safety eyes pose a choking risk for babies; therefore, if making this toy for a baby, I recommend using yarn, felt, or embroidered details.
- Body and head requires stuffing. Stuff as you work to ensure the piece is completely filled.
- Never leave a child unattended with this toy!
Abbreviations & Terms
Abbreviations
- beg – beginning
- bpsc(s) – back post stitch(es)
- C – color
- ch(s) – chain stitch(es)
- dec – decrease (2 scs together) (you can use usual ar invisible decrease)
- inc – increase (2 sc in same st) (you can use usual ar invisible increase)
- MR – magic ring, also known as magic circle
- R(s) – round(s)
- sc(s) – single crochet(s)
- sl st(s) – slip stitch(es)
- st(s) – stitch(es)
General Terms
- Number of round or row is in bold and in a color as R Number (example: R 1)
- Stitch(es) repetition is in round brackets with multiplication number, see: (…) x 2 – work everything in () as a group and then repeat it as many times as written in the pattern.
- All rows/rounds start in the same stitch as the chain or stitch at the beginning of the row/round.
- Join the round with slip stitch made into the first stitch of the round, slip stitch doesn’t count as a stitch unless otherwise stated.
- Total number of stitches in one round or the row is in square brackets, orange color [… ]
- An exclamation mark indicates a change or a crucial moment → !
- Changed text color indicates a crucial moment
- If the number of some stitches is written before the stitch, work ONE stitch into each of next NUMBER of stitches (example: 3 sc).
- If the number is written after the stitch you work those stitches into the same stitch (example: sc 3).
Don’t you want to read this pattern online?
We have a solution for you:
Froggy Mommy Pattern
Crochet the perfect frog rattle! This cute rattle is designed for your newborn or as a baby shower gift. It has a balanced shape to grip and rattling with beautiful eyes detailing and your baby will love this toy. This is a DIGITAL PRODUCT! For more information read description.
Pattern Instructions
Overview
The toy is made of 4 parts in 4 colors:
- Body
- Head
- Eyes with eyelids (2 pieces)
👉🏼Short Note For You, Read It Before You Start Crochet This Pattern
In the first step, please read the instructions to the end.
It is important that you decide at the beginning whether you will attach the eyes to the head before the head is filled in, as well as whether you will create the mouth before the head is filled in.
I decided to do the following for this particular pattern :
• I made the eyes complete with eyelids
• I crocheted the head to row R 19
• I sewed the eyes to the head
• I sewed on the frog’s mouth and sewed on the cheeks.
But I usually do the following:
• I crochet the head
• I crochet the body
• I fill both parts and sew them together
• I crochet the complete eyes and sew them to the finished head
• sew on the smile and sew on the head cheeks.
Crochet Frogy Mommy Body
Body starts from the bottom.
R 1: Start with C1. Beg with MR with 6 scs, join the 1th sc with sl st [6]
R 2: 6 incs, join the 1th sc with sl st [12]
R 2: ch, (1 sc, 1 inc) x 6, join the 1th sc with sl st [18]
R 4: ch, (2 scs, 1 inc) x 6, join the 1th sc with sl st [24]
R 5: ch, (3 scs, 1 inc) x 6, join the 1th sc with sl st [30]
R 6: ch, (4 scs, 1 inc) x 6, join the 1th sc with sl st [36]
R 7 – 15: 36 scs, join the 1th sc with sl st [36]
R 16: ch, (4 scs, 1 dec) x 6, join the 1th sc with sl st [30]
R 17 – 21: 30 scs, join the 1th sc with sl st [30]
R 22: ch, (3 scs, 1 dec) x 6, join the 1th sc with sl st [24]
R 23 – 27: 24 scs, join the 1th sc with sl st [24]
End with sl st, cut yarn leaving a long tail (approx. 40 cm | 16 inch) to attach the head to the body.
Stuff Frogy Mommy body with filling
I like to fill all crochet amigurumi toys little bit firmlier. That’s because I know that the filling, even if it’s lightened, will shift down over time. And, don’t forget, washing will beat the filling also together.
Head
Head starts from the top.
R 1: Start with C1. Beg with MR with 6 scs, join the 1th sc with sl st [6]
R 2: ch, (1 inc) x 6, join the 1th sc with sl st [12]
R 3: ch, (1 sc, 1 inc) x 6, join the 1th sc with sl st [18]
R 4: ch, (2 scs, 1 inc) x 6, join the 1th sc with sl st [24]
R 5: ch, (3 scs, 1 inc) x 6, join the 1th sc with sl st [30]
R 6: ch, (4 scs, 1 inc) x 6, join the 1th sc with sl st [36]
R 7: ch, (5 scs, 1 inc) x 6, join the 1th sc with sl st [42]
R 8 – 12: 42 scs, join the 1th sc with sl st [42]
R 13: ch, (6 scs, 1 inc) x 6, join the 1th sc with sl st [48]
R 14 – 15: 48 scs, join the 1th sc with sl st [48]
👉🏼 Change color to C2 – agave
👉🏼 In the next row you are going to work stitches into the back post only.
R 16: 48 bpcs, join the 1th sc with sl st [48]
R 17: ch, (6 scs, 1 dec) x 6, join the 1th sc with sl st [42]
R 18: ch, (5 scs, 1 dec) x 6, join the 1th sc with sl st [36]
R 19: ch, (4 scs, 1 dec) x 6, join the 1th sc with sl st [30]
👉🏼 Stuff head with filling ! In the middle of filling, insert rattle.
R 20: ch, (3 scs, 1 dec) x 6, join the 1th sc with sl st [24]
R 21: ch, (2 scs, 1 dec) x 6, join the 1th sc with sl st [18]
👉🏼 If needed, stuff head with some filling, to gain firm head
R 22: ch, (1 scs, 1 dec) x 6, join the 1th sc with sl st [12]
End with sl st. Cut the yarn. There’s no need to leave a long tail. Insert left yarn tail into the head.
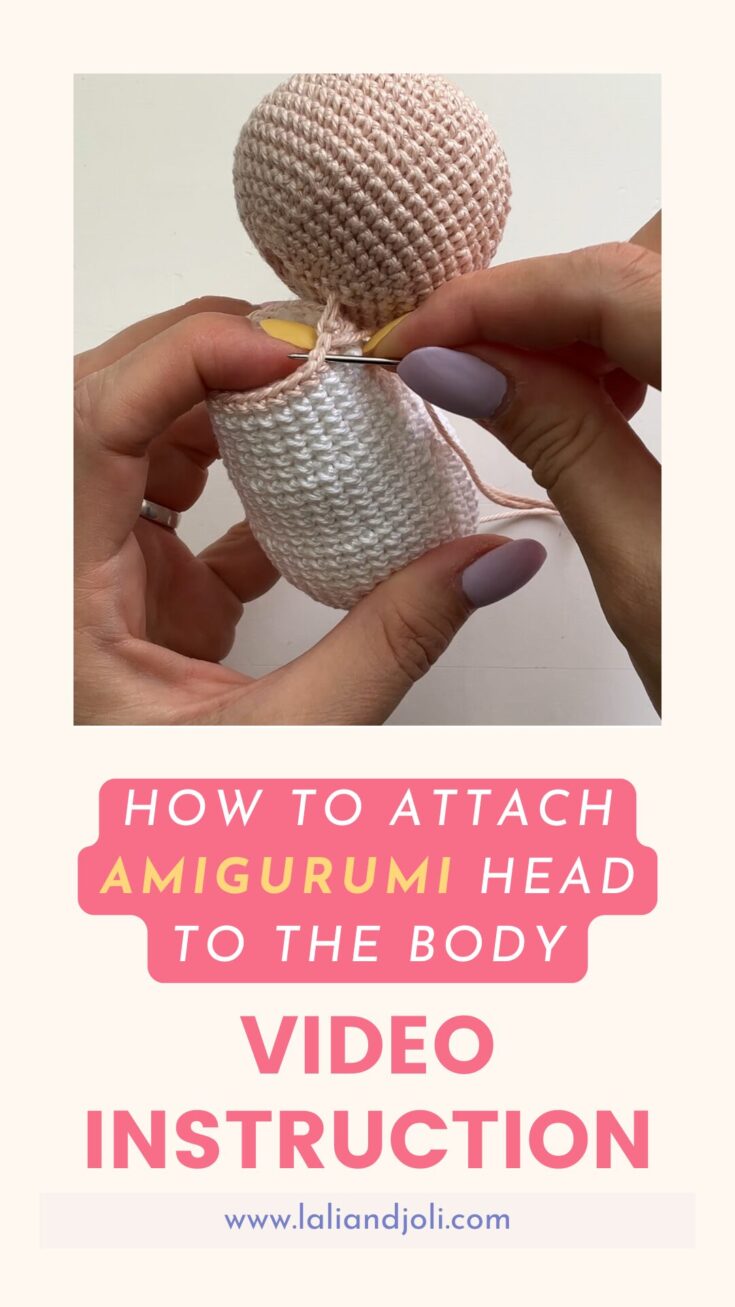
Assembling Body with Head
• You are going to sew the head together with the body.
• Join the head and body back to back. This is where the crochet rows join together.
• You will use the long tail of the body that you left after you finished crocheting.
• Sew 24 stitches around the body, and you will sew body into the R 20, and R 21 of the head, you will use 24 gaps between sts.
For more details you can read a post How to Attach Amigurumi Head to the Body. It containes two video instructions as well.
How to Attach Amigurumi Head to the Body
Detailed description with diagram and video instructions how to attach the Amigurumi head to the body.
Frog Eye (make 2)
Frog eye is composed of two parts. One part is the eye in white (C4: weiss/white) and the other is the eyelid in dark green (C3: altrosa).
Eye starts from the top.
Start with C4.
R 1: Beg with MR with 6 scs, join the 1th sc with sl st [6]
R 2: ch, (1 inc) x 6, join the 1th sc with sl st [12]
R 3: ch, (1 sc, 1 inc) x 6, join the 1th sc with sl st [18]
R 3 – R 6: 18 scs, join the 1th sc with sl st [18]
👉🏼 Insert safety eyes.
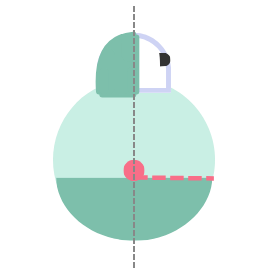
For the RIGHT eye: insert SE between 5th & 6th sc from the row beginning and between 4th & 5th row.
For the LEFT eye: insert SE between 5th & 6th sc from the row beginning and between 7th & 8th row.
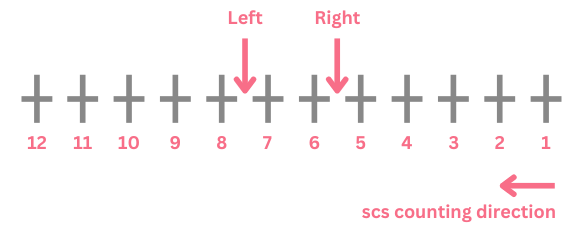

The difference between the left and the right eye is that the connecting row line is located on the outside of the frog’s head for each side of the eye, as shown on the picture.
R 5: ch, (1 sc, 1 dec) x 6, join the 1th sc with sl st [12]
Cut the yarn and leave a long tail to sew eyes to the head (approx. 30 cm / 12 inch).
Eyelid (make 2)
Eyelid starts from the centre.
Start with C2.
R 1: Beg with MR with 6 scs, join the 1th sc with sl st [6]
R 2: ch, (1 inc) x 6, join the 1th sc with sl st [12]
R 3: ch, (1 sc, 1 inc) x 4, 1 inc, 4 scs, join the 1th sc with sl st [18]
R 4 – R 5: ch, 15 scs, sl st, turn [15]
R 6: ch, 15 scs, sl st [15]
Cut the yarn and leave a long tail to sew eyes to the head (approx. 30 cm / 12 inch).
Assembling Eyes
Cover the eye with the eyelid and sew them together. Use C2 yarn.
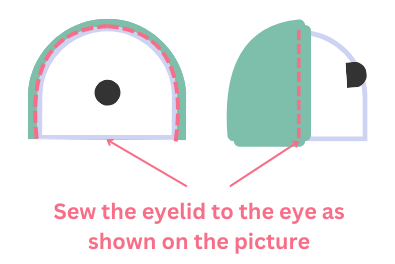
The difference between the left and the right eye is that the connecting row line is located on the outside of the frog’s head for each side of the eye, as shown on the picture.
Sew eyes to the head, between 3rd and 11th row, use C2 and C4 yarn as show you frogs eyes.
Cheek (make 2)
Cheek starts from the centre.
Start with C3: altrosa
R 1: Beg with MR with 6 scs, join the 1th sc with sl st [6]
Cut the yarn and leave a long tail to sew eyes to the head.
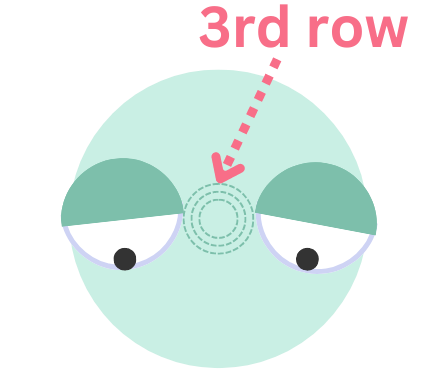
The Mouth Embroidery / Crocheting
Use pink yarn C3: altrosa.
You need an estimate of about 50 cm of yarn if you are going to embroider the mouth.
Now, you can decide whether to embroider the mouth with a needle and loop stitch, or crochet using slip stitch.
Make 22 sl sts / loop stitches. Be sure you start right under the middle of eye, as shown on the piture.
Assembling Cheeks
Sew cheeks right under the middle of the eye and slightly above the mounth line, as shown on the picture above.
♥ Additional Tip ♥
You can make “dots” and sew them directly onto the body of the frog, they will be fine on the back.
You can choose any of the colors used on the body, except the body color, or you can even use different colored yarn remnants.
Make them however you like, be creative, make a unique design.
Small Dot
R 1: Beg with MR with 6 scs, join the 1th sc with sl st [6]
End with sl st, cut yarn leaving a longer tail to attach the body.
Bigger Dot
R 1: Beg with MR with 6 scs, join the 1th sc with sl st [6]
R 2: ch, (1 inc) x 6, join the 1th sc with sl st [18]
End with sl st, cut yarn leaving a longer tail to attach the body.
What do you think about Frogy Mommy Pattern?
Do you like this pattern? What do you think about the pattern? Let us know in the comments below the post, we’d love to read them!
Did you make this project?
We would love to see what you have created so mention us @laliandjoli or tag us using #createdwithl&j so we can see your creations!
Save now, crochet later! 👇🏻

Copyright
Please be respectful of my work and do not modify, sell or share my patterns.
You can sell finished items made from this pattern if they are handmade by yourself in a limited number and you give credit to the designer. Please add the following text to your item description for any item designed by Hana Ráczová – Lali and Joli that you are selling:
„This product is handmade by [your name] from a design and pattern by Hana Ráczová at Lali and Joli. See www.laliandjoli.com for more information.“
Mass production using my patterns is not allowed.
COPYRIGHT ©Hana Ráczová – www.laliandjoli.com 2024 – ALL RIGHTS RESERVED WORLDWIDE
YOUR RIGHTS: This pattern Frogy Mommy and its content are restricted to your personal use only. It does not come with any other rights.
This pattern Frogy Mommy and its content are protected by international copyright law and may not be modified, compiled, combined with other content, copied, recorded, synchronized, transmitted, translated, formatted, distributed, publicly displayed, publicly performed, reproduced, given away, used to create derivative works and otherwise used or exploited (including for-profit) without the creator’s expressed permission. The creator retains full copyrights to this pattern Frogy Mommy and its content. Any portion of graphics, photography, elements or other creative content is the copyright of the respective owners and is used within the terms of license(s) and/or granted permission(s).
The creator has made every reasonable effort to be as accurate and complete as possible in the creation of this pattern Bunny Mommy and its content, and to ensure that the information provided is free from errors; however, the creator assumes no responsibility for errors, omissions, or contrary interpretation of the subject matter herein and does not warrant or represent at any time that the contents within are accurate due to the rapidly changing nature of the subject matter.
Any perceived slights of specific persons, peoples, or organizations are unintentional. Any product, website, and company names mentioned in this pattern Frogy Mommy and its content are the trademarks or copyright properties of their respective owners. The creator is not associated or affiliated with them in any way. Nor does the referred product, website, and company sponsor, endorse, or approve this pattern Frogy Mommy and its content.


